Introducing Kong.ai - World's 1st Self-Training AI Bot

Try Now

To integrate ClickDesk with Google Tag Manager and Google Analytics, you'll first need a Google Analytics account and a ClickDesk account. Then you'll need to set up Google Tag Manager with these simple steps.

  1. Sign in to your existing Google account.
  2. Go to Google Tag Manager and create an account for your company, then setup a container for your website.
  3. google tag manager


    google tag manager


  4. Once you've created a Google Tag Manager account, move on to the appropriate section below to integrate ClickDesk with Google Analytics implementing Google Tag Manager.

Complete the Integration (Old UI)


If you are using the older Google Tag Manager UI, follow these setup steps to make sure that live chat events are recorded correctly.

  1. Login to your Google Tag Manager account. Select NEW > Tag.
  2. google tag manager-3


  3. Name the tag, e.g. gaLiveChat or gaClickDeskLiveChat, and select Google Analytics > Universal Analytics as the Tag Type.
  4. google tag manager-4


  5. Enter your Tracking ID.
  6. In the Track Type section, select Event.
  7. google tag manager-5


  8. Click on the macro button in the Category field and select New macro from the drop-down list.
  9. google tag manager-6


  10. Name the macro, e.g. gaLiveChatCategory, and select Data Layer Variable as the Macro Type.
  11. google tag manager-7


  12. Enter 'eventCategory' as the Data Layer Variable Name and click Save.
  13. google tag manager-8


  14. Create a new macro for the Action field. Name it, e.g. gaLiveChatAction, select Data Layer Variable as the Macro Type, enter 'eventAction' as the Data Layer Variable Name and click Save.

  15. Create a new macro for the Label field. Name it, e.g. gaLiveChatLabel, select Data Layer Variable as the Macro Type, enter 'eventLabel' as the Data Layer Variable Name and click Save.

  16. Create a new macro for the Non-Interaction Hit field. Name it, e.g. gaLiveChatInteraction, select Data Layer Variable as the Macro Type, enter 'eventInteraction' as the Data Layer Variable Name and click Save. You are now finished creating data layer variables.

  17. Click on +Add in the Firing Rules section and select Create new rule.
  18. google tag manager-9


  19. Name the rule, e.g. gaLiveChatRule, set the triggering rule to {{event}} equals and enter 'ClickDesk LiveChat' as the event name.
  20. google tag manager-10


  21. Click on the Save button to finish adding the rule.

  22. Next, click on the Save button to finalize the configuration.
  23. google tag manager-11


  24. Publish the version to put the changes into effect. You have now integrated ClickDesk with Google Tag Manager and Google Analytics.
  25. google tag manager-12

Complete the Integration (New UI)


If you are using the newer UI, follow these setup steps to make sure that live chat events are recorded correctly.

  1. Login to your Google Tag Manager account. Select NEW > Tag.
  2. new-tag


  3. Select Google Analytics as the Product and Universal Analytics as the Tag Type.
  4. untitled-tag


  5. Click on the More option when choosing a trigger, then click New to set up a new firing rule.
  6. existing-triggers


  7. Select Custom Event.
  8. create-trigger


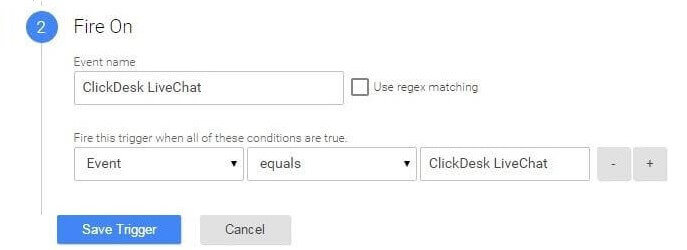
  9. Type 'ClickDesk LiveChat' as the Event Name, complete the trigger conditions and save the trigger.
  10. fire-on


  11. Name the Tag, e.g. gaClickDeskLiveChat, and type in your Tracking ID.
  12. choose-tag


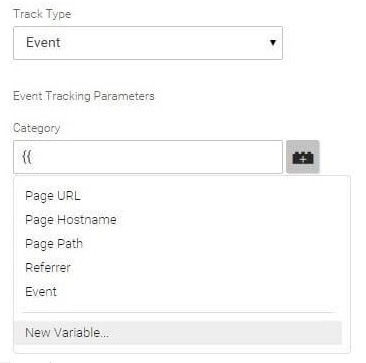
  13. Select Event as the Track Type, then click on the macro button and select New Variable as the Category.
  14. track-type


  15. Choose Data Layer Variable as the Variable Type.
  16. create-variable


  17. Name the variable, e.g. gaLiveChatCategory, and type in 'eventCategory' as the Data Layer Variable Name. Click on the Create Variable button to create the variable.
  18. create-variable-2


  19. In the same way, create a new variable for the Action field. Select Data Layer Variable as the Variable Type, name it, e.g. gaLiveChatAction, enter 'eventAction' as the Data Layer Variable Name, then click on the Create Variable button.

  20. Create a new variable for the Label field. Select Data Layer Variable as the Variable Type, name it, e.g. gaLiveChatLabel, enter 'eventLabel' as the Data Layer Variable Name and click on the Create Variable button.

  21. Create a new variable for the Value field. Select Data Layer Variable as the Variable Type, name it, e.g. gaLiveChatValue, enter 'eventValue' as the Data Layer Variable Name and click on the Create Variable button.

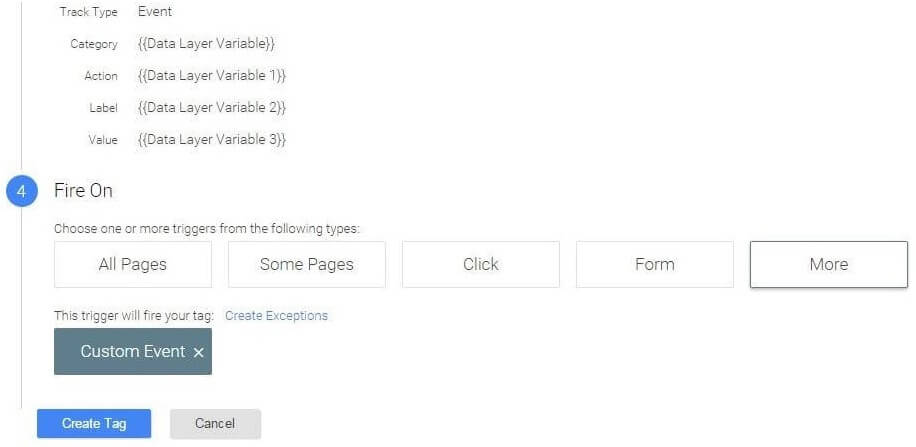
  22. Select Create Tag to finalize these changes.
  23. fire-on-2


  24. After you complete the setup, click Publish Now to put the changes into effect. (If necessary, preview and debug your changes first.) You will now be able to use Click Desk with Google Tag Manager and Google Analytics.
  25. publish-now


chat icon

Convert visitors to happy customers

Awesome combo of live-chat, voice and video